
How to make Halloween pumpkins in 2022 🎃 : On Halloween day, celebrated on October 31, it is customary to decorate the grounds and adjacent areas with pumpkins, as they are the main symbol of this holiday.
According to legend, the Halloween pumpkin is called Jack. His other names are "Devil's Fire", "Death Candle". Indeed, this legend says that Jack encountered the leader of the evil spirits while walking through town and used trickery to persuade him to climb a tree for the juicy fruit.
As soon as he climbed the tree, Jack carved a cross into the trunk, blocking the prisoners' escape route. Jack then negotiated with the devil for his own eternal life. And because he was drunk, they didn't take him to heaven, so he had to roam the streets all his life with the embers of turnips that the devil condescendingly threw at him.
So how to carve a Halloween pumpkin easily?
Table of contents
How to make an easy Halloween pumpkin?
Moving on to the most interesting part, we find out how to make a Halloween lantern from a pumpkin:
- First you need to wash the pumpkin thoroughly with dishwashing detergent - this is necessary so that later it will be easy to draw on its surface.
- Now cut off the top of the pumpkin. Sometimes the "cover" is buckled, but this is not necessary at all and does not particularly affect the appearance of the lantern. It is advisable to hold the knife at an angle so that the lid does not accidentally fall into the lantern later.
- Cut the excess pulp from the lid and make several punctures with a sharp knife or an awl so that the candles burn better and the hot air comes out of the pumpkin more quickly without roasting it from the inside.
- Now you need to scrape out the pumpkin seeds and pulp to get a "basket" with walls about 1-2cm thick (depending on the size of the pumpkin). Walls that are too thin will break, walls that are too thick will be difficult to break through.
- The preparatory work is done, let's move on to the creative part - we draw future holes on our pumpkin. The classic version is the image of a sinister face with a toothy smile. If you like more original stories, you can depict bats, ghosts, witches and vampire castles, or whatever else comes to mind.
- Draw future holes on the pumpkin skin with a pen or marker. If you have chosen some kind of complex plot, then remember that the pumpkin elements must be in contact with each other. For the first time, you can use ready-made templates – they are easy to find on the web. The main thing is that the pattern should be proportional to the size of the pumpkin.
- For cutting, it is best to use a kitchen knife with a sharp tip. The smaller the pattern, the narrower the blade should be. Ideally, you should stock up on several knives.
- The final step is to put a candle (or more candles) in the pumpkin, light it, and put the lid on Jack's pumpkin for Halloween. The lantern is ready! Turn off the light and admire its eerie glow.
How do you prevent a Halloween pumpkin from rotting?
It takes a lot of time and effort to carve a beautiful Halloween pumpkin. Many people are very upset when the artwork starts to form right after Halloween. There are several ways to keep your pumpkins smiling and mold-free after Halloween. Below are more details about these methods.
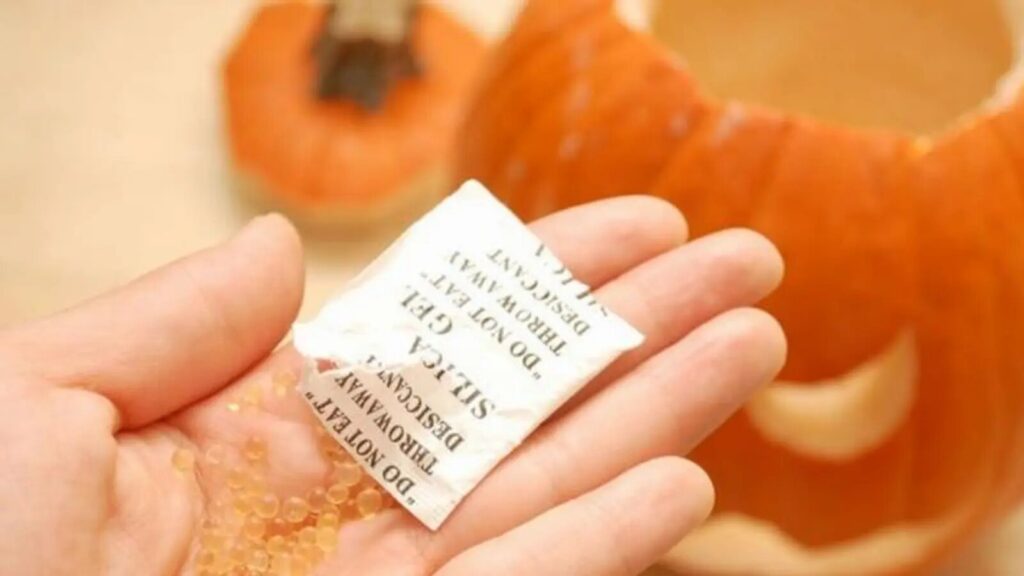
silica gel
Find a bag of silica gel. Silica gel is used as a desiccant and has the ability to remove excess moisture.
What causes pumpkin rot and mold?
Here are some simple but effective combos. Check your closet or wardrobe for previously purchased silica gel. If you can't find any, you can buy silica gel sachets in bulk at a very good price at the market. Silica gel bags usually come with the following products:
- beef jerky
- Shoes and shoe boxes
- cat filler
Remove the beads from the silica gel bag. Do not leave pellets unattended as they can be dangerous for your pet or your child. Silica gel itself is not toxic, but manufacturers sometimes add other toxic substances.
Put silica gel balls in the pumpkin. Remove the top of the pumpkin. Take a ball of silica gel and attach it to the pumpkin. Don't push the ball too deep. The appearance of the pumpkin will change.
Eau de Javel
Mix 1 teaspoon of bleach with 3,8 liters of water to make enough solution to submerge an entire squash.
The idea is that the bleach has antibacterial properties and the water hydrates pumpkin skin like a moisturizer for human skin.
Dip the pumpkin in the bleach solution, completely covering it with the liquid. Soak the pumpkin in the solution for about 8 hours.
Remove the pumpkin from the bleach solution and pat it dry with a paper towel or sponge.
Dampen the pumpkin daily with a bleach solution. Spray the outside and inside of the pumpkin with the solution to keep the pumpkin in its original condition. Wipe off excess moisture after spraying. It should be noted that humidity is an ally of mold.
How to make paper pumpkins for Halloween?
The easiest and cheapest way to make your own pumpkins for Halloween is to make them out of cardboard and paper. These can be plain paper pumpkin faces printed from a template. Instead of using a paper pumpkin model, you can use a printed photo or drawing found on the Internet.
You can use stencils found on the Internet as templates for smiles and eyes. Also, by combining these prints, you can change the combination of smiles and eyes. Remember that, for safety, the candle must be placed in a gourd that fits easily into the candle holder.
Also, below are the instructions that will help you to make your paper Halloween pumpkin:
- Draw a pumpkin on a sheet of paper. It is advisable to take a leaf from a cage in order to calculate the symmetry.
- Cut out a paper pumpkin template and attach it to the felt, folded in half. Circle the template around the fabric and cut out 2 pieces.
- Draw stripes on one of the pieces and sew with a thread of a contrasting color. This will be the "snout" of the pumpkin.
- Cut out the eyes, mouth, and nose from brown felt and brush these details onto the "muzzle" of the pumpkin.
- Sew the 2 pumpkin pieces together, leaving a hole for the putty on one side. Attach a leaf-shaped piece of green felt to the top.
- Insert the filler and brush the pumpkin with your hands.
- Here is such a cute Halloween pumpkin DIY that you made with your own hands.
- At the top of the product, fasten the ribbon in the form of a loop so that the craft can be hung.
How to make a Halloween pumpkin with a pumpkin?
The most important attribute of the halloween party is Jack's jack-o-lantern! You can create it yourself from a rounded pumpkin, giving the lantern an intimidating look, because on this evening everything should be intimidating!
We present below the steps that will teach you how to make the Halloween pumpkin with a pumpkin:
- Prepare the pumpkin. Long, oblong pumpkins are not suitable for a lantern – look for and get a rounded fruit. Rinse thoroughly with water to remove dirt and dry with a towel.
- With a regular pen, draw eyes and a mouth on the pumpkin, you can use a nose, but in large sizes to make it easier for you to cut. Small details will be difficult to cut out, so don't be overzealous. If you want, you can print a scary smile on paper, on a printer and cut it out, making a stencil on a pumpkin. Also draw a cap – you will need to remove the inside of the fruit.
- Slowly start cutting from the lid. Use a small, sharp knife.
- Select the inside of the pumpkin and cut out the eyes, smile. Gently rinse the lantern inside and out, leave to act for 10 minutes. The juice will come out inside the pumpkin, it will need to be drained or blotted with a paper towel.
- Place a rounded candle inside the fruit and light it while checking the contraption. Cover with a lid. Your Halloween hero is completely ready!
- Light a candle at night and enjoy your work by spooking the guests.
Read also: How to save the pumpkin to make a lantern? & How to Convert 50g to ML and Other Liquids: Tutorial and Practical Tips
How to cut a pumpkin easily?
Pumpkin carving is a super fun Halloween tradition for all ages that can be used to create spooky decorations that brighten up the night.
Indeed, it only takes 30 to 60 minutes to carve a pumpkin, making it a great after-meal activity.
So, below are the steps that will help you to cut a pumpkin easily:
- Open and clean the pumpkin: Line your work area with newspapers or a large trash bag. Work on a clean, hard surface like a dining table or the kitchen floor. Spread a layer of newspaper or cut a large trash bag to unroll it into a large tarp to pick up any spills or messes you make.
- Build and carve your design: draw on the pumpkin with a washable marker to create a freehand drawing. If you want to let loose and really get creative, let your imagination run wild and draw your design directly onto the pumpkin skin. If you don't like your drawing or want to make a change, simply wipe the marker with a damp paper towel and redraw.
- Carved Pumpkin Illumination and Display: Put the tealight candles inside the pumpkin. Light one or two small tealight candles and place them in the bottom of the gourd. Flip the lid over the pumpkin to light up your design so it's visible. Just make sure the tealights are extinguished at the end of the night so they don't burn out and start a fire.
Discover: How to successfully organize your Halloween party? & How to watch Halloween movies in chronological order?
Conclusion
Now you know how to make a Halloween pumpkin with your own hands and create a holiday atmosphere in October. Buy pumpkins of different sizes, depending on your tasks, and create!
It doesn't matter if you're carving a small Halloween pumpkin or a big one. The main thing is to enjoy the process and create a truly impressive decoration.
What if you can't find the perfect pumpkin? Don't despair, use your imagination. Even if you decide to cut out a face, you can come up with something unusual and do it. Irregularly shaped pumpkins will help do this.
Don't forget to post the article on Facebook and Twitter!