You are quietly seated on your sofa, ready to enjoy your favorite film, when suddenly... your Velux remote control lets you go in the middle of the trailers! Don't panic, we have the solution for you!
In this article, we will explain to you in a simple and fun way how to change the batteries in your Velux remote control. No more moments of frustration and acrobatics trying to operate your roller shutters remotely. Follow our tips and you'll be back in charge in no time. So, get ready to become a Velux remote control expert and discover our tips to never be caught off guard again.
Table of contents
How to change the batteries in a Velux remote control

Change the batteries of a Velux remote control is a task that may seem intimidating, but in reality, it is quite simple and quick to complete. Let me walk you through this process step by step, so you can do it with confidence and ease.
How to open the remote control:
- Locate the beep flap.
- Press the arrow located on the valve.
- Press a button if the remote control is new generation.
Access the batteries
The first step is to access the battery compartment. To do this, you must remove the compartment cover. It is unlocked by pressing the button RESET with a small screwdriver. This allows you to access existing batteries, which you can then remove to replace with new ones.
Choosing the Right Batteries
It is crucial to choose the right type of batteries for your Velux remote control. The required type is AA/LR6. However, it should also be noted that the Velux remote control requires AAA batteries with a voltage of 1,5 volts. Before you begin the replacement process, make sure you have these batteries on hand.
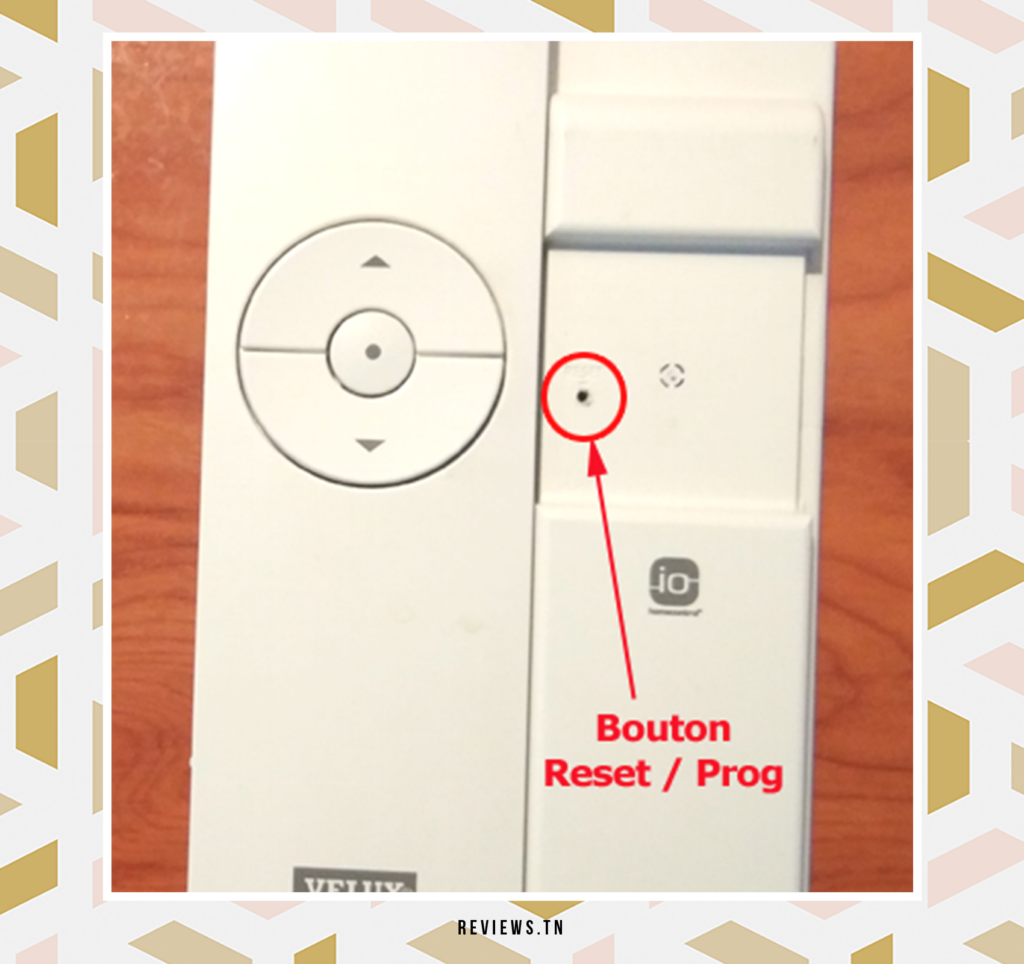
Insert new batteries
Once you have the new batteries, it's time to insert them into the remote's battery compartment. It is important to pay attention to the alignment of the positive and negative poles. The plus sign (+) indicates the positive pole, which should be slightly protruding on AA, AAA batteries, C and D. The negative pole is flat and may or may not have a minus (-) sign or the “-” symbol.
Replace the cover
After inserting the new batteries, the last step is to replace the battery compartment cover. The remote control cover can be detached by pressing a button on the bottom of the remote control, revealing the battery compartment. Once the new batteries are in place, simply replace the compartment cover.
Recharge a Velux remote control
If you have a rechargeable Velux remote control, it should be noted that the recharging process requires a few extra steps. First, you need to disconnect the power to the product/window during its movement phase, wait a minute, then reconnect the power. Then, select the product (such as a blind or curtain) on the remote control and press the “STOP” or “CLOSE” buttons in sequence. Then wait for the product to recalibrate its two positions.
To read >> Increase your iCloud storage for free with iOS 15: tips and features to know & How to change the battery of an Orange TV remote control easily and quickly?
How to change the batteries of a roller shutter remote control
Going from a bright ambiance to a more intimate atmosphere with a simple click is the privilege that a roller shutter remote control offers us. But what to do when this precious accessory stops working? Don't panic, most often, a simple battery change is enough to solve the problem. Here's how to do it, in a few quick and easy steps.
Unscrew the screws
Armed with your trusty Phillips screwdriver, start by unscrewing the two screws nestled on the back of the remote. These two little metal keepers hold the two parts of the remote securely in place. Once defeated, you can open the remote like a book to reveal the battery compartment.
Remove the old battery
The next step is to dislodge the old battery from its housing. To do this, you can use a sharp object, such as a small flat screwdriver or the tip of a knife. Remember, this battery has worked hard to provide you with comfort and convenience, so handle it with care to avoid damage.
Insert the new battery
Once the old battery is removed, it's time to welcome the new one. Make sure you choose the correct size and type of battery. Insert it by matching the positive and negative poles as indicated on the battery compartment. A small gesture for you, but a big step for the optimal functioning of your remote control!
Replace the cover
After inserting the new battery, all you have to do is close the remote control. Replace the battery compartment cover, then tighten the two screws to seal it. There you go, your remote control is ready to return to service!
By following these steps, you should be able to revive your roller shutter remote control in no time. After all, having a working remote control is essential to fully enjoying the convenience of your roller shutters. So, don't hesitate to change the batteries whenever necessary!
Discover >> Apple ProMotion display: Learn about the revolutionary technology and how it works & DisplayPort vs HDMI: Which is better for gaming?
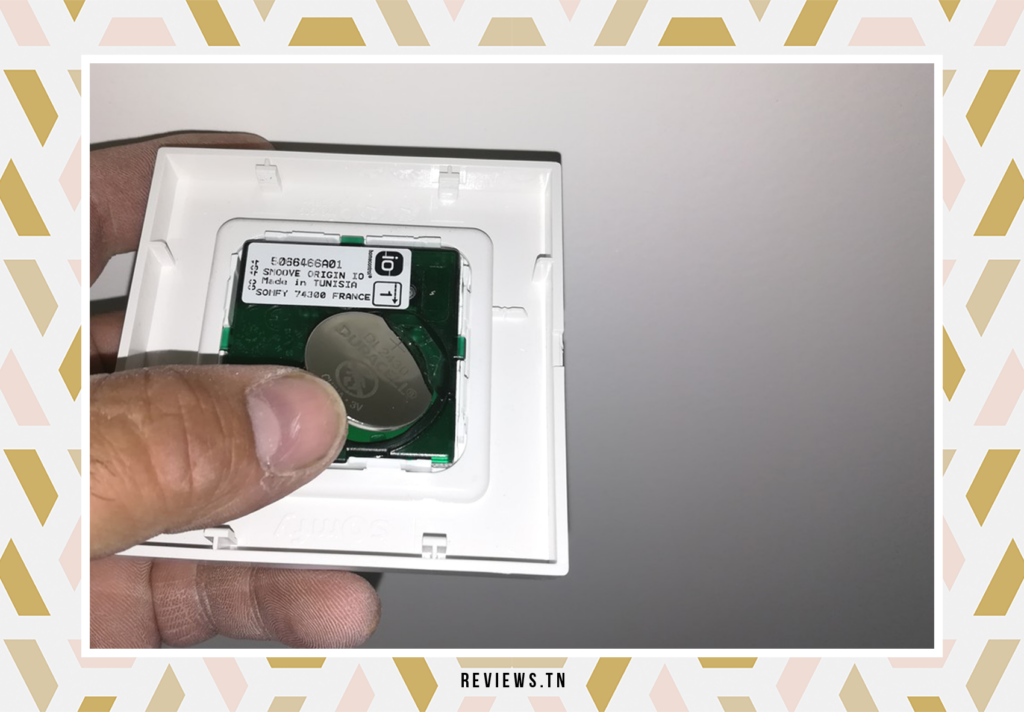
How to reset a Velux solar remote control
There comes a time when every electronic object, despite its ingenuity and advanced technology, requires a reset – a reboot of sorts. This is also the case for your trusty Velux solar remote control. But don't worry, resetting is a relatively simple process that you can do yourself.
Imagine a beautiful sunny day, you are comfortably seated in your living room, enjoying the natural light filtering through your Velux window. Suddenly, your Velux solar remote control seems to no longer respond. Do not panic! It's time to reset your device and bring it back to life.
Start by looking for the reset button. It is located on the back of the remote control. Once you find it, use a thin, sharp object to hold this button down for about 10 minutes. This may seem like a long time, but this is the time it takes for the remote to prepare for the reset.
After these 10 minutes, a message appears on the screen of your remote control: “The remote will be reset. Do you want to continue ? ». At this point, you are one step away from the rebirth of your remote control. Simply select “YES” and the reset will begin.
Resetting your Velux solar remote control is a crucial step to maintain its proper functioning. So the next time your remote seems finicky, don't hesitate to follow these simple steps to give it a fresh start.
Also read >> List: The Best Touchless Hydroalcoholic Gel Vending Machines
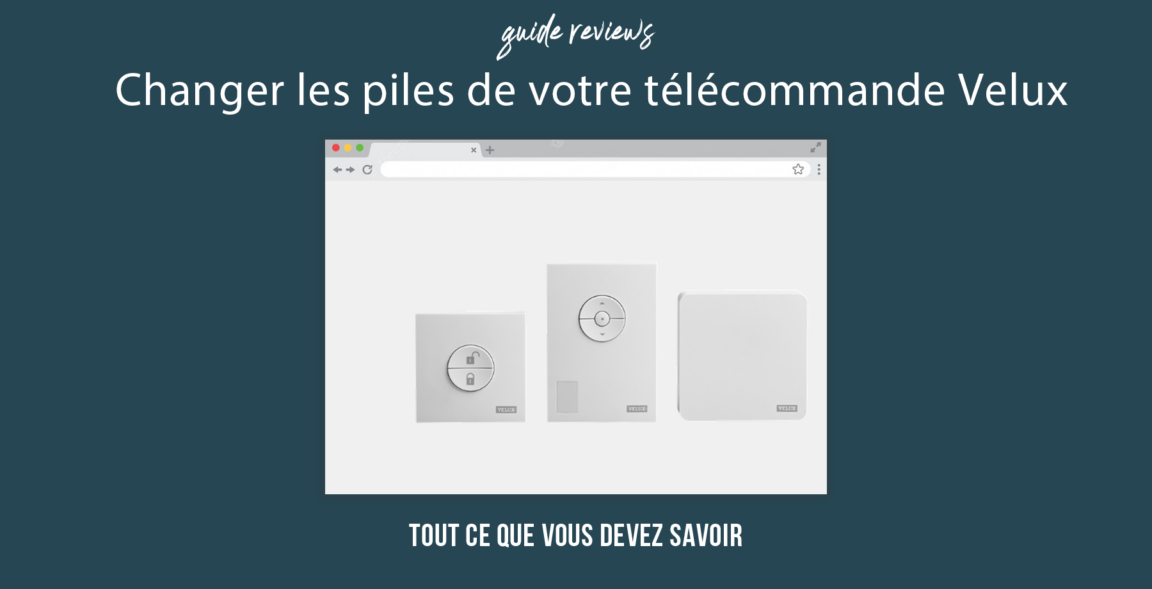
How to change the battery of a Velux CR2032 remote control
Are you facing problems with your Velux remote control? The problem could be with the battery. If your remote uses a CR2032 battery, the replacement process is slightly different than other batteries. Don't panic, I'm here to guide you through every step.
Remove the battery tray
First, get a thin tool – a paperclip will do the job just fine. Use it to press the release button, usually located on the back of the remote. This will remove the battery tray. Be careful to avoid damaging your remote control.
Replace the battery
Next, remove the old battery. Be careful not to leave any residue on the battery contacts. Once you've done that, grab your new CR2032 battery. Make sure the positive pole is facing up before inserting it into the compartment. CR2032 batteries are readily available at most electronics stores and supermarkets.
Replace the battery tray
After inserting the new battery, it's time to put the battery tray back in place. Make sure it is securely attached and the remote turns on. By following these steps carefully, you should be able to change the battery in your Velux remote control no problem. Keep in mind that it is essential to regularly check the condition of your batteries to ensure that your remote control is still working properly.
Remember, if you're having trouble, take a break and try again. And if you need help, don't hesitate to consult a professional. Good luck with your battery change!
Discover also >> B&O Beosound Balance review: Astonishing connected speakers!